


이전에 cluster mesh 구성을 해본 경험이 있긴 한데 연결 후 어떤 설정이 있는지 어떻게 동작하는지까지 확인을 해보려 합니다.
2024.10.13 - [K8S/cilium] - Cilium ClusterMesh 구성해보기
테스트 환경 만들기
kind k8s 클러스터 west, east 배포해봅니다.
kind create cluster --name west --image kindest/node:v1.33.2 --config - <<EOF
kind: Cluster
apiVersion: kind.x-k8s.io/v1alpha4
nodes:
- role: control-plane
  extraPortMappings:
  - containerPort: 30000 # sample apps
    hostPort: 30000
  - containerPort: 30001 # hubble ui
    hostPort: 30001
- role: worker
  extraPortMappings:
  - containerPort: 30002 # sample apps
    hostPort: 30002
networking:
  podSubnet: "10.0.0.0/16"
  serviceSubnet: "10.2.0.0/16"
  disableDefaultCNI: true
  kubeProxyMode: none
EOF
여기에 테스트에 필요한 도구들도 설치해봅니다.
docker exec -it west-control-plane sh -c 'apt update && apt install tree psmisc lsof wget net-tools dnsutils tcpdump ngrep iputils-ping git -y'
docker exec -it west-worker sh -c 'apt update && apt install tree psmisc lsof wget net-tools dnsutils tcpdump ngrep iputils-ping git -y'
동일하게 east도 진행합니다.
kind create cluster --name east --image kindest/node:v1.33.2 --config - <<EOF
kind: Cluster
apiVersion: kind.x-k8s.io/v1alpha4
nodes:
- role: control-plane
  extraPortMappings:
  - containerPort: 31000 # sample apps
    hostPort: 31000
  - containerPort: 31001 # hubble ui
    hostPort: 31001
- role: worker
  extraPortMappings:
  - containerPort: 31002 # sample apps
    hostPort: 31002
networking:
  podSubnet: "10.1.0.0/16"
  serviceSubnet: "10.3.0.0/16"
  disableDefaultCNI: true
  kubeProxyMode: none
EOF
똑같이 테스트 도구를 설치합니다.
docker exec -it east-control-plane sh -c 'apt update && apt install tree psmisc lsof wget net-tools dnsutils tcpdump ngrep iputils-ping git -y'
docker exec -it east-worker sh -c 'apt update && apt install tree psmisc lsof wget net-tools dnsutils tcpdump ngrep iputils-ping git -y'
중간에서 테스트하기 위한 컨테이너도 띄워줍니다.
docker run -d --rm --name mypc --network kind --ip 172.17.0.100 nicolaka/netshoot sleep infinity
이제 각각의 클러스터에 cilium을 설치합니다. 기존과는 다르게 cluster.name과 cluster.id를 설정하여 클러스터를 식별할 수 있도록 합니다.
# west 설치
cilium install --version 1.17.6 --set ipam.mode=kubernetes \
--set kubeProxyReplacement=true --set bpf.masquerade=true \
--set endpointHealthChecking.enabled=false --set healthChecking=false \
--set operator.replicas=1 --set debug.enabled=true \
--set routingMode=native --set autoDirectNodeRoutes=true --set ipv4NativeRoutingCIDR=10.0.0.0/16 \
--set ipMasqAgent.enabled=true --set ipMasqAgent.config.nonMasqueradeCIDRs='{10.1.0.0/16}' \
--set cluster.name=west --set cluster.id=1 \
--context kind-west

# east 설치
cilium install --version 1.17.6 --set ipam.mode=kubernetes \
--set kubeProxyReplacement=true --set bpf.masquerade=true \
--set endpointHealthChecking.enabled=false --set healthChecking=false \
--set operator.replicas=1 --set debug.enabled=true \
--set routingMode=native --set autoDirectNodeRoutes=true --set ipv4NativeRoutingCIDR=10.1.0.0/16 \
--set ipMasqAgent.enabled=true --set ipMasqAgent.config.nonMasqueradeCIDRs='{10.0.0.0/16}' \
--set cluster.name=east --set cluster.id=2 \
--context kind-east
편한 작업을 위해 alias 설정도 해주겠습니다.
# alias 설정
alias kwest='kubectl --context kind-west'
alias keast='kubectl --context kind-east'
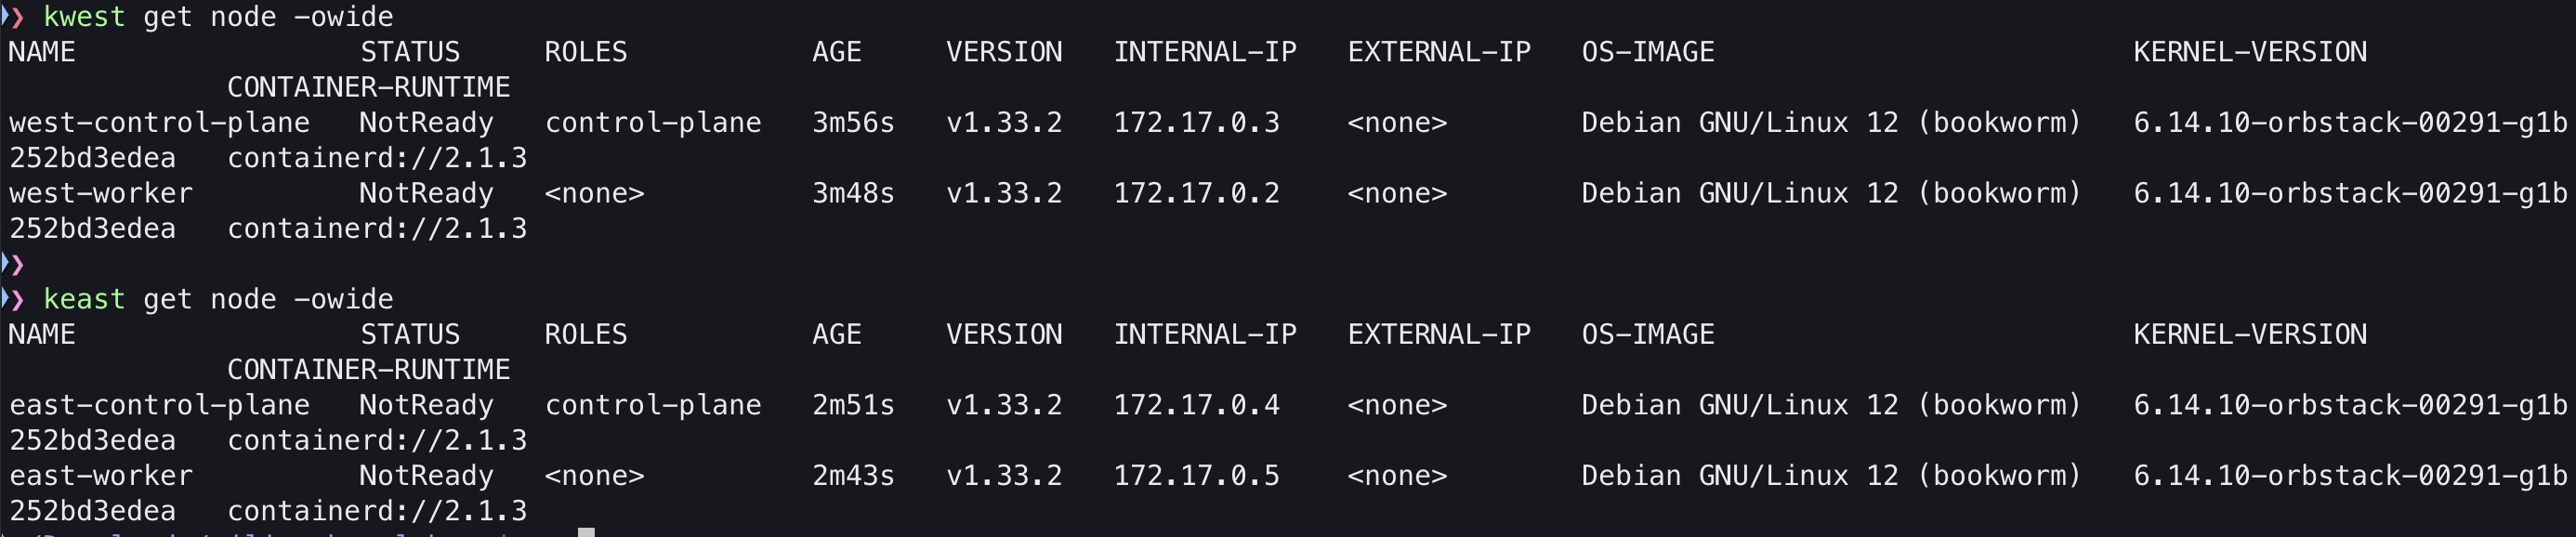
# 확인
kwest get node -owide
keast get node -owide
그리고 같은 인증서를 사용할 수 있도록 east의 cilium-ca를 삭제한 뒤 west의 cilium-ca로 추가해줍니다.
keast get secret -n kube-system cilium-ca
keast delete secret -n kube-system cilium-ca

kubectl --context kind-west get secret -n kube-system cilium-ca -o yaml | \
kubectl --context kind-east create -f -

keast get secret -n kube-system cilium-ca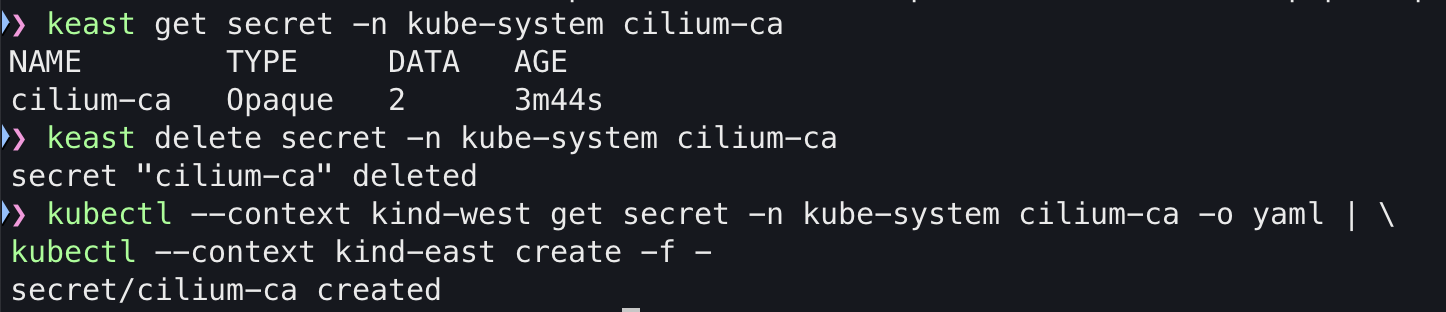
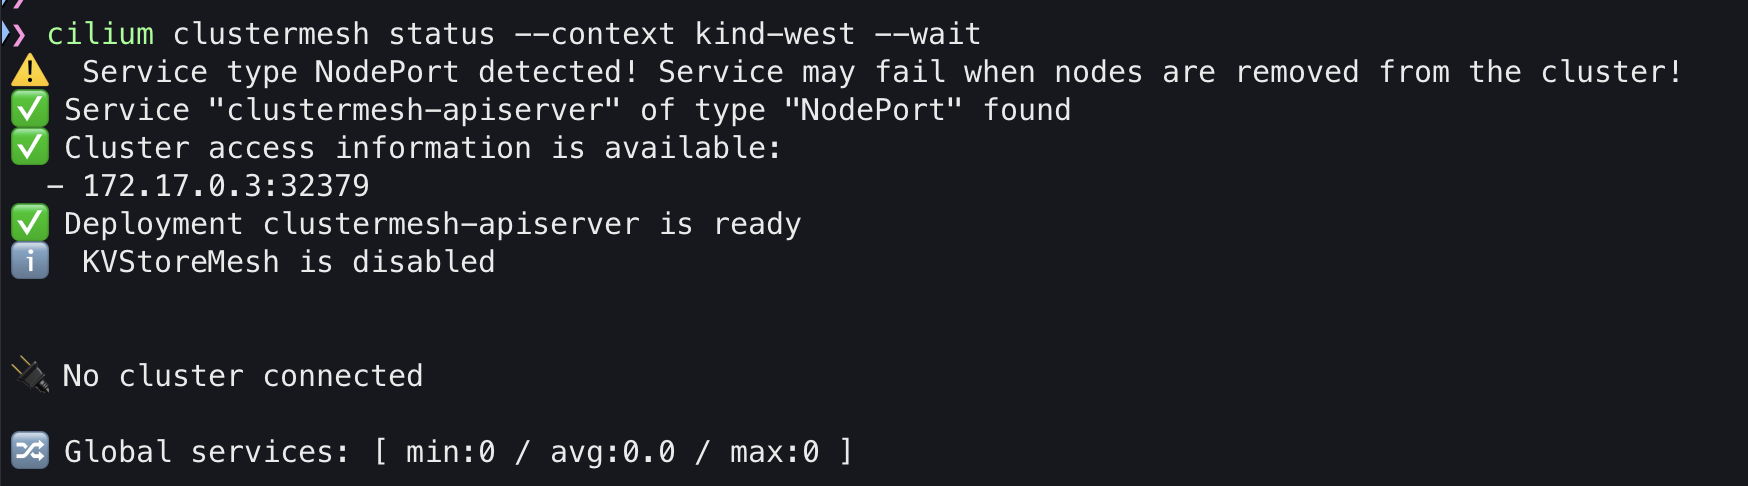
cluster mesh의 상탤ㄹ 확인해보면 아직은 활성화가 안되어서 에러가 발생합니다.
cilium clustermesh status --context kind-west --wait
cilium clustermesh status --context kind-east --wait
다음의 명령어로 cluster mesh를 활성화 합니다.
# Enable Cluster Mesh : 간단한 실습 환경으로 NodePort 로 진행
cilium clustermesh enable --service-type NodePort --enable-kvstoremesh=false --context kind-west
cilium clustermesh enable --service-type NodePort --enable-kvstoremesh=false --context kind-east
활성화가 되고 나면 다음과 같이 출력됩니다.
활성화 하고 나면 이렇게 clustermesh api server가 새로 생깁니다.

이제 연결을 해보겠습니다.
cilium clustermesh connect --context kind-west --destination-context kind-east

연결후 상태정보를 확인해보면 각각의 클러스터에서 상대방의 클러스터 정보가 보이는게 보입니다.
통신 테스트 해보기
각각의 클러스터에 파드를 하나씩 띄워봅니다.
#
cat << EOF | kubectl apply --context kind-west -f -
apiVersion: v1
kind: Pod
metadata:
  name: curl-pod
  labels:
    app: curl
spec:
  containers:
  - name: curl
    image: nicolaka/netshoot
    command: ["tail"]
    args: ["-f", "/dev/null"]
  terminationGracePeriodSeconds: 0
EOF

cat << EOF | kubectl apply --context kind-east -f -
apiVersion: v1
kind: Pod
metadata:
  name: curl-pod
  labels:
    app: curl
spec:
  containers:
  - name: curl
    image: nicolaka/netshoot
    command: ["tail"]
    args: ["-f", "/dev/null"]
  terminationGracePeriodSeconds: 0
EOF
이제 각 파드를 호출해봅니다.
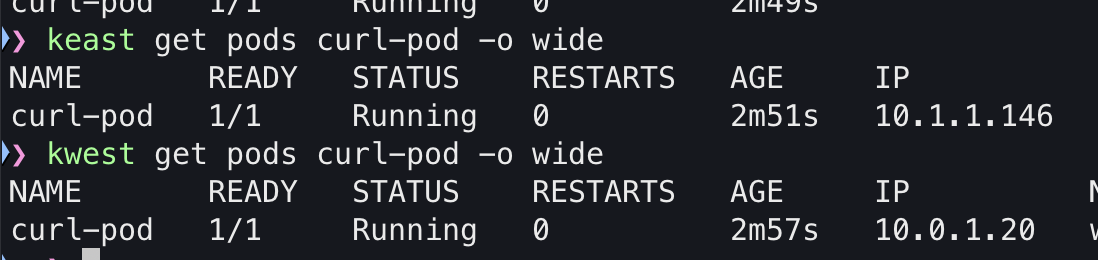
east의 파드는 10.1.1.146 west의 파드는 10.0.1.20 입니다. 먼저 west에서 east 파드를 띄워보겠습니다.
kubectl exec -it curl-pod --context kind-west -- ping -c 1 10.1.1.146
이번엔 반대로 east에서 west 파드를 호출해보겠습니다.
kubectl exec -it curl-pod --context kind-east -- ping -c 1 10.0.1.20
통신이 잘되는 것을 확인했으니 이번엔 tcpdump를 띄워보겠습니다.
# 목적지 파드에서 tcpdump 로 확인 : NAT 없이 직접 라우팅.
kubectl exec -it curl-pod --context kind-east -- tcpdump -i eth0 -nn

# 목적지 k8s 노드?에서 icmp tcpdump 로 확인 : 다른곳 경유하지 않고 직접 노드에서 파드로 인입 확인
docker exec -it east-control-plane tcpdump -i any icmp -nn
docker exec -it east-worker tcpdump -i any icmp -nn
'K8S > 🔥 network study🔥' 카테고리의 다른 글
| [cilium] Service Mesh 구성하기 (shared 모드) (0) | 2025.08.22 |
|---|---|
| [cilium] containerlab으로 lb ippool 테스트 해보기 (6) | 2025.08.17 |
| [cilium] BGP Control Plane (1) | 2025.08.15 |
| [cilium] VxLAN, Geneve 오버레이 모드 (작성중) (1) | 2025.08.10 |
| [cilium] LB IPAM에 Cilium L2 Announement 적용하기 (9) | 2025.08.09 |