

istio 오퍼레이터나 helm, istioctl등 쿠버네티스에 istio를 설치할 수 있는 다양한 방법이 있는데
istio 오퍼레이터나 istioctl 사용 시, 변경 내용을 명확히 파악하기 어려울 수 있습니다.
istioctl을 argocd에 플러그인으로 추가하여 배포 전 변경점을 쉽게 확인하면서
istio operator (커스텀 리소스)도 계속 사용할 수 있는 방법을 공유드립니다.
2.6이후부터는 cmp를 추가하는 방식이 조금 변경되긴 했지만
기본 동작방식은 비슷하기 때문에 가장 최근 버전인 2.9버전 기준으로 설명하도록 하겠습니다.
istio 플러그인 (cmp) 추가 방법
GitHub - nueavv/argocd-in-argocd
Contribute to nueavv/argocd-in-argocd development by creating an account on GitHub.
github.com
istio-plugin의 예제를 참고하여 테스트해볼 수 있습니다.
▪️ step 1) argocd 플러그인 CMP(config management plugins) 작성
configmanagement plugin은 실제 커스텀 리소스가 아닌 argocd repo server에서 이해하기 위한 하나의 형식입니다
추가적인 옵션에 대해서는 설명하지 않습니다.
apiVersion: argoproj.io/v1alpha1
kind: ConfigManagementPlugin
metadata:
  name: istioctl
spec:
  version: 1.20.3
  init:
    command: [sh]
    args: [-c, 'echo "Initializing... "']
  generate:
    command: [sh, -c]
    args:
      - |
        /plugins/kustomize build . | /plugins/istioctl manifest generate -f -
  discover:
    fileName: istio*.yaml
  preserveFileMode: false
- version: (선택) 플러그인 버전을 명시합니다. 여기서는 istioctl의 버전을 추가했습니다.
- init: 플러그인이 동작할때 실행되는 부분입니다.
- generate: 이 플러그인을 통해 manifest를 생성해낼 코드를 작성합니다.
kustomize build를 통해 나온 manifest를 istioctl 명령어로 메니페스트를 만들어 내는 코드를 넣었습니다. - discover: 이 플러그인이 활성(실행) 가능한 레파지토리인지 확인하기 위한 설정입니다.
istio라고 시작되는 파일이 있는 경우 이 플러그인을 활성화 할 수 있습니다. - preserveFileMode: 파일의 실행모드인가 정하는것인데 레파지토리의 내용을 실행하는 플러그인의 경우 필요할 것 같습니다.
▪️ step 2) cmp 설정을 configmap으로 배포하기
configMapGenerator:
- files:
  - plugins/plugin.yaml
  name: argocd-plugins
generatorOptions:
  disableNameSuffixHash: true
argocd를 배포하는 kustomization 파일에 다음과 같이 configmap을 추가합니다.
▪️ step 3) argocd-repo-server에 사이드카 (+cmp) 및 initContainer 추가
apiVersion: apps/v1
kind: Deployment
metadata:
  labels:
    app.kubernetes.io/component: repo-server
    app.kubernetes.io/name: argocd-repo-server
    app.kubernetes.io/part-of: argocd
  name: argocd-repo-server
spec:
  template:
    spec:
      initContainers:
      - name: istio-download
        image: curlimages/curl:8.6.0
        command:
        - sh
        - -c
        args:
        - |
          curl -L https://istio.io/downloadIstio | ISTIO_VERSION=1.20.3 sh -
          cp -p ~/istio-1.20.3/bin/istioctl /plugins/istioctl
          chmod +x /plugins/istioctl
        volumeMounts:
          - mountPath: /plugins
            name: istioctl-bin
      - name: kustomize-download
        image: busybox
        command:
        - sh
        - -c
        args:
        - |
          wget "https://github.com/kubernetes-sigs/kustomize/releases/download/kustomize%2Fv5.3.0/kustomize_v5.3.0_linux_arm64.tar.gz"
          tar -xvf kustomize_v5.3.0_linux_arm64.tar.gz;
          ls -al;
          mv kustomize /plugins/kustomize;
          chmod +x /plugins/kustomize;
        volumeMounts:
          - mountPath: /plugins
            name: istioctl-bin
      containers:
      - name: argocd-plugins
        command: [/var/run/argocd/argocd-cmp-server] # Entrypoint should be Argo CD lightweight CMP server i.e. argocd-cmp-server
        image: busybox # This can be off-the-shelf or custom-built image
        securityContext:
          runAsNonRoot: true
          runAsUser: 999
        volumeMounts:
          - mountPath: /var/run/argocd
            name: var-files
          - mountPath: /home/argocd/cmp-server/plugins
            name: plugins
          # Remove this volumeMount if you've chosen to bake the config file into the sidecar image.
          - mountPath: /home/argocd/cmp-server/config/plugin.yaml
            subPath: plugin.yaml
            name: argocd-plugins
          # Starting with v2.4, do NOT mount the same tmp volume as the repo-server container. The filesystem separation helps
          # mitigate path traversal attacks.
          - mountPath: /tmp
            name: cmp-tmp
          - mountPath: /plugins
            name: istioctl-bin
      volumes:
      - configMap:
          name: argocd-plugins
        name: argocd-plugins
      - emptyDir: {}
        name: cmp-tmp
      - emptyDir: {}
        name: istioctl-bin
argocd-repo-server에 cmp를 추가하는 사이드카를 배포해야합니다.
이때 이 사이드카에 cmp파일은 /home/argocd/cmp-server/config/plugin.yaml 에 꼭 위치해야합니다.
istioctl이 설치된 이미지를 사용해도 되지만 예제에서는 initContainer를 통해 다운받도록 설정했습니다. (+ kustomize)
apiVersion: kustomize.config.k8s.io/v1beta1
kind: Kustomization

namespace: argocd

resources:
- https://raw.githubusercontent.com/argoproj/argo-cd/v2.9.6/manifests/install.yaml

patches:
- path: ./overlays/argocd-secret.yaml
- path: ./overlays/argocd-repo-server.yaml

configMapGenerator:
- files:
  - plugins/plugin.yaml
  name: argocd-plugins
generatorOptions:
  disableNameSuffixHash: true
기존의 argocd-repo-server에 위의 설정을 추가해야하기 때문에 kustomization의 patches를 이용하여
추가하면 자동으로 병합되어 배포할 수 있습니다.
잘 이해가 안되실 분이 있을 것 같아 추가하면
istio-plugin/argocd 폴더로 들어가서 kustomize build 하여 배포해보면
istioctl을 플러그인으로 사용하는 argocd를 배포할 수 있습니다.
적용 결과
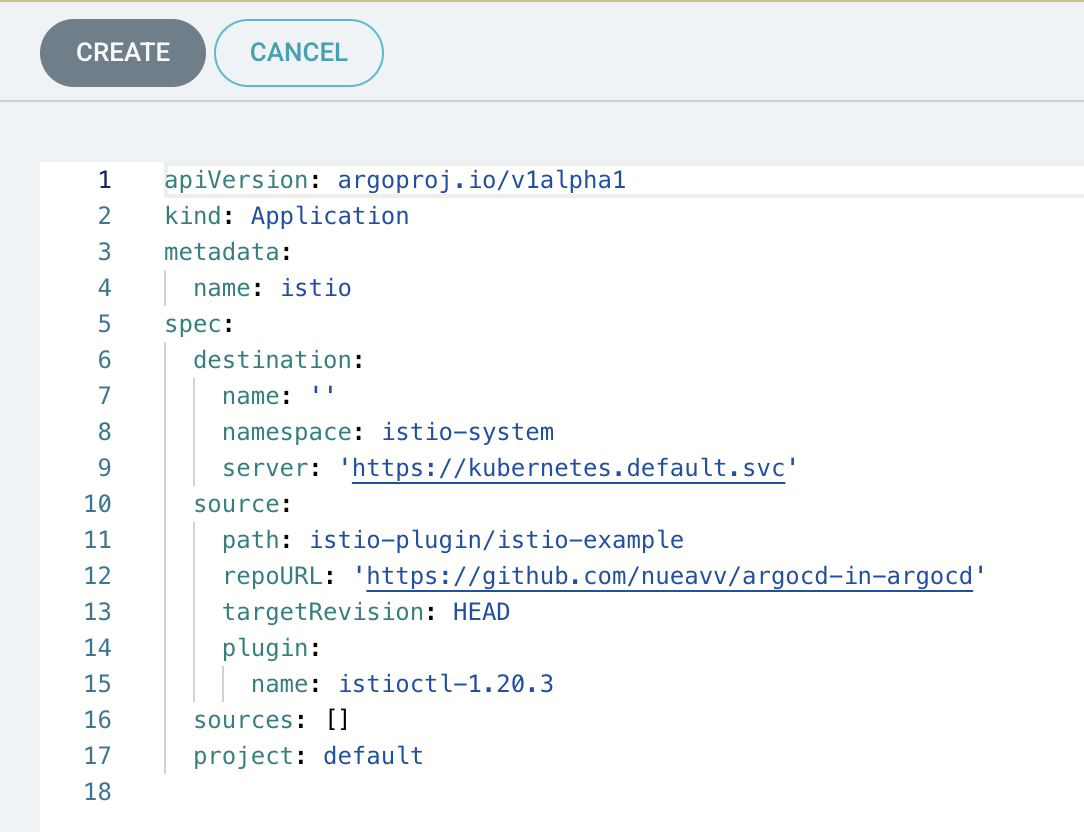
앱 생성하기 )
argocd-in-argocd의 프로젝트 내부의 istio-plugin/istio-example의 배포하는 예제이다.

아래와 같이 되어있는 istio operator 파일을 이용하여 istioctl manifest generate -f 한 값을 argocd로 배포하게 됩니다.
apiVersion: install.istio.io/v1alpha1
kind: IstioOperator
metadata:
  name: istio
spec:
  components:
    base:
      enabled: true
    cni:
      enabled: false
    egressGateways:
    - enabled: false
      name: istio-egressgateway
    ingressGateways:
    - enabled: false
      name: istio-ingressgateway
    istiodRemote:

    생략
잘 적용된 경우 앱생성할 때 플러그인으로 istioctl-1.20.3을 확인할 수 있습니다.
앱 생성 후 )


이제 이렇게 되면 다음에 업그레이드를 하기 전에 argocd의 diff기능을 사용하여 신규로 변경되는 설정들이 무엇인지 확인하고
검증하는데에 사용할 수 있게 됩니다.
'K8S > argocd' 카테고리의 다른 글
| argocd의 로컬 계정 비밀번호 고정하기 (admin 비번 고정 방법) (0) | 2024.09.17 |
|---|---|
| ArgoCD에 EKS 클러스터를 등록하는 3가지 방법 (0) | 2024.09.10 |
| argocd 코드 수정을 위해 로컬에서 빌드하기 (feat OSSCA) (0) | 2024.08.17 |
| argocd를 argocd로 배포하기 (gitops로 관리하기) (1) | 2024.02.10 |
| argocd에 helm gitops로 배포하기 (0) | 2024.02.10 |